Getting started
Gulp Angular generator is simple and stupid, but it does not embrace Angular 1.5 completely now. And I would like use Webpack in the new Angular 1.x project.AngularClass provides a very simple mininal NG6-starter project with Webpack support.
Create project
Clone a copy directly into your local disk.git clone https://github.com/AngularClass/NG6-starter <your project name>

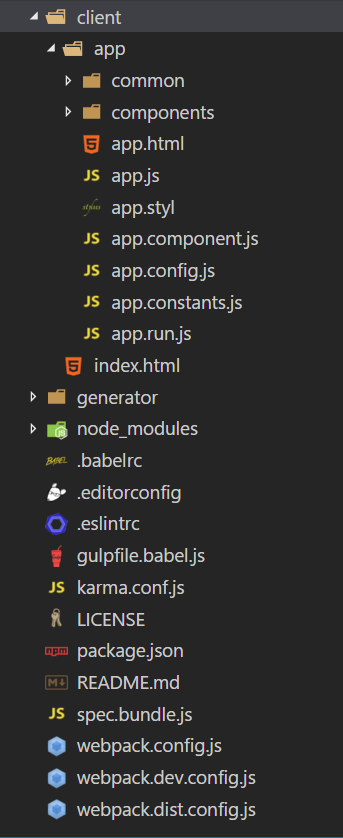
The client holds all source codes of this project.
Under client, there is index.html file which is the entry of this application, and also inlcudes two folders: common and components.
The common folder is the common place to store services, components, driectives etc which can be shared for the whole application scope.
And components folder is the place to save all page oriented components files.
Firstly you have to install all dependencies. Execute the following command in the project root folder.
npm install
gulp serve to run this application immediately. Anytime you can navigate to http://localhost:3000 to play the running application.By default, NG6-stater also provides a simple Gulp task(
gulp component) to generate components quickly.Execute
gulp component in the root folder to generate some components for further development use.gulp component posts
gulp component signin
gulp component signup
Each component specific folder includes serveral files. As an example, let's have a look at posts folder.
- posts.js is the entry js file of posts component.
- posts.component.js is the component definition file.
- posts.controller.js is the controller class for posts component.
- posts.styl is the component specific style file, it uses Stylus.
- posts.html is the template file of posts component.
- posts.spec.js is the testing spec file for posts component.
Reorganize the source codes
Follow this Angular style guide, which describes ES6 and Angular 1.5 component especially.ES6 module is easy to origanise the source codes. It could autoload index.js in folders and no need to specify index in the path. eg.
import CommonModule from './common/';
I would like change the file name of all entry files to index.js. Finally the project file structure should look like(only show index.js files).
|--common
 --index.js
   |--components
    --index.js
     |--navbar
      --index.js
|--components
 --index.js
   |--posts
    --index.js
For example, the index.js in common/components/navbar defines an Angular Module named navbar(to avoid naming conflict, I changed module name to app.common.components.navbar).
import angular from 'angular';
import uiRouter from 'angular-ui-router';
import navbarComponent from './navbar.component';

let navbarModule = angular.module('app.common.components.navbar', [
  uiRouter
])

.component('navbar', navbarComponent)

.name;

export default navbarModule;
import angular from 'angular';
import Navbar from './navbar/';
//...

let commonComponentsModule = angular.module('app.common.components', [
  Navbar,
    ...
])

.name;

export default commonComponentsModule;
import angular from 'angular';
import commonComponentsModule from './components/';
//...

let commonModule = angular.module('app.common', [
  commonComponentsModule,
//...
])
.name;

export default commonModule;
App
|--Common
  |--Components
     |--Navbar
Extract the content of
app.constant(), app.run(), app.config() from app.js into standalone files.app.constants.js:
const AppConstants = {
  appName: "Angular ES6 Sample",
  jwtKey: "id-token",
  api: 'http://localhost:8080/blog-api-cdi/api'
};

export default AppConstants;
import * as vis from 'ui-router-visualizer';

function AppRun(Auth, $rootScope, $state, $trace, $uiRouter, $transitions) {
  "ngInject";

 //...

};

export default AppRun;
function AppConfig($logProvider, toastrConfig, $httpProvider, $stateProvider, $locationProvider, $urlRouterProvider) {
  'ngInject';

  // Enable log
  $logProvider.debugEnabled(true);

  /*
    If you don't want hashbang routing, uncomment this line.
    Our tutorial will be using hashbang routing though :)
  */
  // $locationProvider.html5Mode(true);
  $locationProvider.html5Mode(true).hashPrefix('!');

  $stateProvider
    .state('app', {
      abstract: true,
      component: 'app'
    });

  $urlRouterProvider.otherwise('/');
}

export default AppConfig;
import 'jquery';
import 'tether';
import 'bootstrap';
import 'bootstrap/dist/css/bootstrap.min.css';
import 'font-awesome/css/font-awesome.min.css';
import angular from 'angular';
import toastr from 'angular-toastr';
import 'angular-toastr/dist/angular-toastr.css';
import 'angular-messages';
import 'angular-animate';
import 'angular-touch';
import uiRouter from 'angular-ui-router';
import Common from './common/';
import Components from './components/';
import AppComponent from './app.component';
import AppRun from './app.run';
import AppConstants from './app.constants';
import AppConfig from './app.config';


const requires = [
  'ngTouch',
  'ngMessages',
  'ngAnimate',
  toastr,
  uiRouter,
  Common,
  Components
];

angular.module('app', requires)
  .component('app', AppComponent)
  .constant('AppConstants', AppConstants)
  .config(AppConfig)
  .run(AppRun);
You could have noticed I have added some extra resources into this project, such as Bootstrap, FontAwesome etc.
Add extra resources
By default, the NG6-starter repository includesangular(from official AngularJS) and angular-ui-router(from Angular UI team).Install other Angular NPM packages into this project.
npm install --save angular-messages angular-touch angular-animate
angular-toastr which is toastr integration for Angular. We will use it raise notification messsages to client when we perform some actions.npm install --save angular-toastr
npm install --save font-awesome bootstrap@4.0.0-alpha4 jquery tether
If you encounter Bootstrap errors like "Bootstrap requires JQuery" etc. when run this project, even you have import them in the app.js file, try to add the following configuration into webpack.config.file to overcome this issue.
plugins:[

    new ProvidePlugin({
      jQuery: 'jquery',
      $: 'jquery',
      jquery: 'jquery',
      "Tether": 'tether',
      "window.Tether": 'tether'
    }),
    ...
Install webpack plugins:
css-loader, file-loader and url-loader.npm install --save-dev css-loader file-loader url-loader
module: {
    loaders: [
        ...
        { test: /\.css$/, loader: 'style!css' },
        { test: /\.(png|woff|woff2|eot|ttf|svg)(\?v=[0-9]\.[0-9]\.[0-9])?$/, loader: 'url-loader?limit=100000' }
Component
We have created several components in before steps.In Angular 1.5, a component can be defined as an object and register it via
angular.component().Check the content of posts.component.js file. It define an object named
postsComponent:import template from './posts.html';
import controller from './posts.controller';
import './posts.styl';
let postsComponent = {
restrict: 'E',
bindings: {},
template,
controller
};
export default postsComponent;
index.js file.let postsModule = angular.module('posts', [commonSevices, uiRouter])
.component('posts', postsComponent)
.name;
The controller is still responsive for handling events and serving data bindings for template.
class PostsController {
  constructor() {
    'ngInject';

    this.name = 'posts';
    this.q = "";
    this.posts = [];
  }

  $onInit() {
    console.log("initializing Posts...");
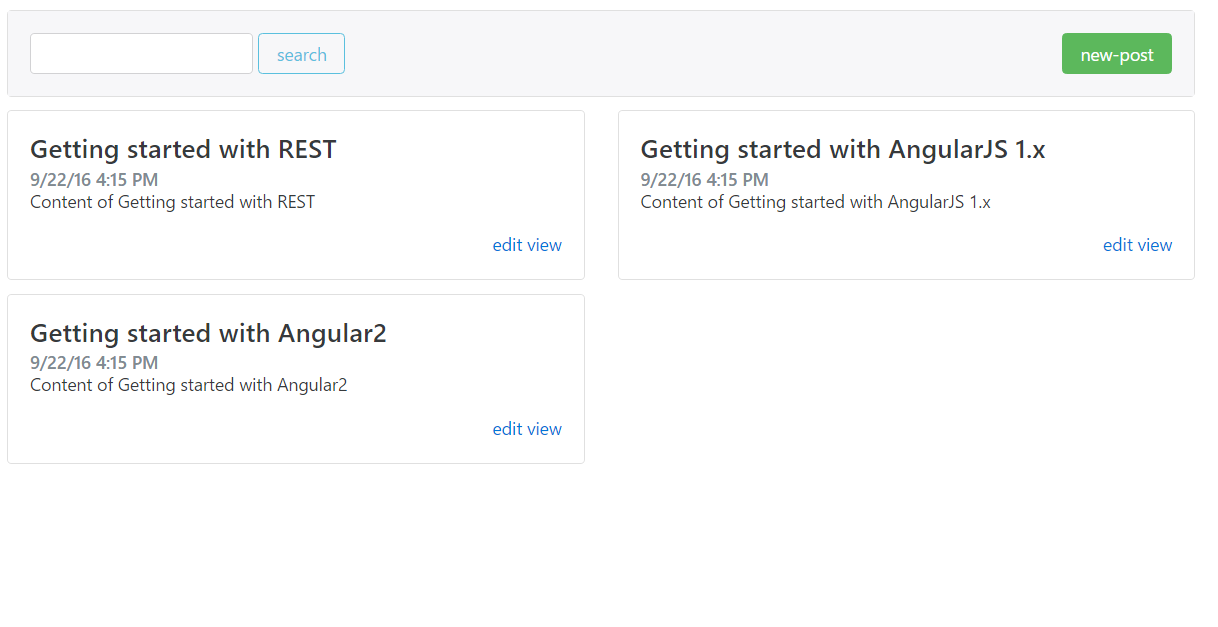
    this.posts = [
       { id: 1, title: 'Getting started with REST', content: 'Content of Getting started with REST', createdAt: '9/22/16 4:15 PM' },
       { id: 2, title: 'Getting started with AngularJS 1.x', content: 'Content of Getting started with AngularJS 1.x', createdAt: '9/22/16 4:15 PM' },
       { id: 3, title: 'Getting started with Angular2', content: 'Content of Getting started with Angular2', createdAt: '9/22/16 4:15 PM' },
    ]
  }

  $onDestroy() {
    console.log("destroying Posts...");
  }

  search() {
    console.log("query posts by keyword" + this.q);
  }
}

export default PostsController;
$onInit, $onChange, $onDestroy, $postLink etc. Let's have a look at posts template file: posts.html.
<div class="card">
  <div class="card-block bg-faded">
    <div class="row">
      <div class="col-md-9">
        <form class="form-inline" ng-submit="$ctrl.search()">
          <div class="form-group">
            <input type="text" name="q" class="form-control" ng-model="$ctrl.q" />
          </div>
          <button type="submit" class="btn btn-outline-info">{{'search'}}</button>
        </form>
      </div>
      <div class="col-md-3">
        <span class="pull-md-right">
          <a href="#" class="btn btn-success" ui-sref="app.new-post">new-post</a>
        </span>
      </div>
    </div>
  </div>
</div>

<div class="row">
  <div class="col-md-6" ng-repeat="post in $ctrl.posts ">
    <div class="card card-block">
      <h4 class="card-title">{{post.title}}</h4>
      <h6 class="card-subtitle text-muted">{{post.createdAt}}</h6>
      <p class="card-text">{{post.content}}</p>
      <div class="text-md-right">
        <a href="# " ui-sref="app.edit-post({id: post.id})">edit</a>
        <a href="# " ui-sref="app.view-post({id: post.id})">view</a>
      </div>
    </div>
  </div>
</div>
$ctrl by default. You can change it by specifying a controllerAs property of component.let postsComponent = {
//...
controllerAs:'myCtrl'
};
Route
In this project, we useangular-ui-router instead of the Angular official router. It is more powerful and provides more features. For example:
- It contains a state machine to manage routings.
- It supports nested multi-views.
In the app template file:
app.html, insert a ui-view directive.<navbar></navbar>
<div class="page">
<div class="container">
<div ui-view></div>
</div>
</div>
$stateProvider
    .state('app', {
      abstract: true,
      component: 'app'
    });

 $urlRouterProvider.otherwise('/');
import angular from 'angular';
import uiRouter from 'angular-ui-router';
import postsComponent from './posts.component';

let postsModule = angular.module('posts', [uiRouter])
  .config(($stateProvider) => {
    "ngInject";
    $stateProvider
      .state('app.posts', {
        url: '/posts',
        component: 'posts'
      });
  })
  .component('posts', postsComponent)
  .name;

export default postsModule;
ui-view diretive defined in app template.Now try to run this project in browser.
Entry root folder, execute the following command.
gulp serve

Repeat
gulp component command and add more components, such as new-post, edit-post, post-detail, and move the generated files in compoents/posts folder. Do not care about the content of them, we will implement them later.Add route config in compoents/posts/index.js file.
//...
import postDetailComponent from './post-detail.component';
import newPostComponent from './new-post.component';
import editPostComponent from './edit-post.component';

let postsModule = angular.module('posts', [commonSevices, uiRouter])
  .config(($stateProvider) => {
    "ngInject";
    $stateProvider
      //...
      .state('app.view-post', {
        url: '/post-detail/:id',
        component: 'postDetail'
      })
      .state('app.edit-post', {
        url: '/edit-post/:id',
        component: 'editPost'
      })
      .state('app.new-post', {
        url: '/new-post',
        component: 'newPost'
      });
  })
  //...
  .component('postDetail', postDetailComponent)
  .component('newPost', newPostComponent)
  .component('editPost', editPostComponent)
  .name;

export default postsModule;
For example:
<a href="#" class="btn btn-success" ui-sref="app.new-post">new-post</a>
<a href="# " ui-sref="app.edit-post({id: post.id})">edit</a>
<a href="# " ui-sref="app.view-post({id: post.id})">view</a>
ui-sref directive accepts a state name and state params.If the application is running, it should be sync with browser by default. Try to navigate to new-post, edit-post, post-detail pages by click these links.
Try to add posts and new-post link into the navbar component.
Modify the common/compoents/navbar/navbar.html.
<nav class="navbar navbar-fixed-top navbar-light bg-faded" style="background-color: #e3f2fd;">
<div class="container">
<a class="navbar-brand" ui-sref="app.home" href="#"><i class="fa fa-home"></i>ANGULAR ES6</a>
<button class="navbar-toggler hidden-sm-up" type="button" data-toggle="collapse" data-target="#exCollapsingNavbar" aria-controls="exCollapsingNavbar2" aria-expanded="false" aria-label="Toggle navigation">
☰
</button>
<!-- Collect the nav links, forms, and other content for toggling -->
<div class="collapse navbar-toggleable-xs" id="exCollapsingNavbar">
<ul class="nav navbar-nav">
<li class="nav-item" ui-sref-active="active"><a class="nav-link" href="#" ui-sref="app.posts">{{'posts'}}</a></li>
<li class="nav-item" ui-sref-active="active"><a class="nav-link" href="#" ui-sref="app.new-post">{{'new-post'}}</a></li>
<li class="nav-item" ui-sref-active="active"><a class="nav-link" href="#" ui-sref="app.about">{{'about'}}</a></li>
</ul>
<!-- /.navbar-collapse -->
</div>
</div>
<!-- /.container-fluid -->
</nav>
ui-sref-active will add class active to the element when route is activated.
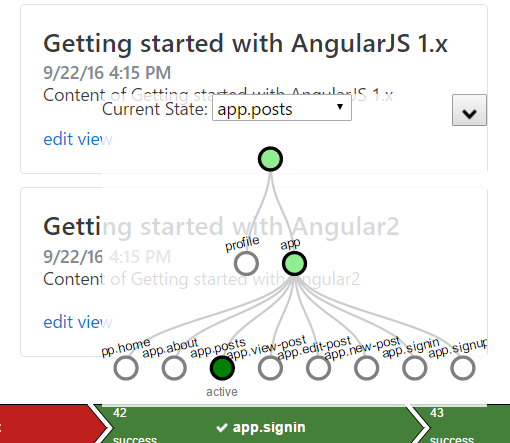
Angular UI Router provides some tools to track the route change.
Add the following codes into app.run.js to activate transition track.
$trace.enable('TRANSITION');

With help of
ui-router-visualizer, you can explore the state tree in a visual graph.npm install --save ui-router-visualizer
import * as vis from 'ui-router-visualizer';

//...
vis.visualizer($uiRouter);

评论