VMware(the SpringSource's mother company) provides a PAAS cloud
service(aka CloudFoundry.com), you can easily deploy your application
into CloudFoundry.com via Roo CloudFoundry addon or CloudFoundry.com
client tools.
And VMware also provides a Eclipse IDE plugin, with which you can deploy the application into CloudFoundry in IDE, just like deploy into your local server instance.

Execute
If you encounter a warning for the license, follow the warning info and type
Run the following command to search "cloud" keyword in the search results list.
Firstly login in cloudfoundry.com,
Bind the created MySQL service to your application.
Open your browser, go to http://<yourAppName>.cloudfoundry.com.

If not, you can switch to the Extension tab in the SpringSource Dashboard interface. And find CloudFoundry in the list, click the checkbox before the CloudFoundry item and hint Install button to install it into your IDE.
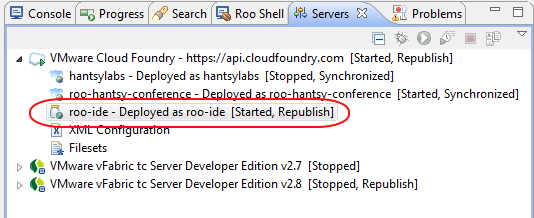
If it is stopped, try to start it by clicking the Start in the context menu. You can also perform a Full publish to deploy a fresh application into CloudFoundry.
Navigate to the application home page.
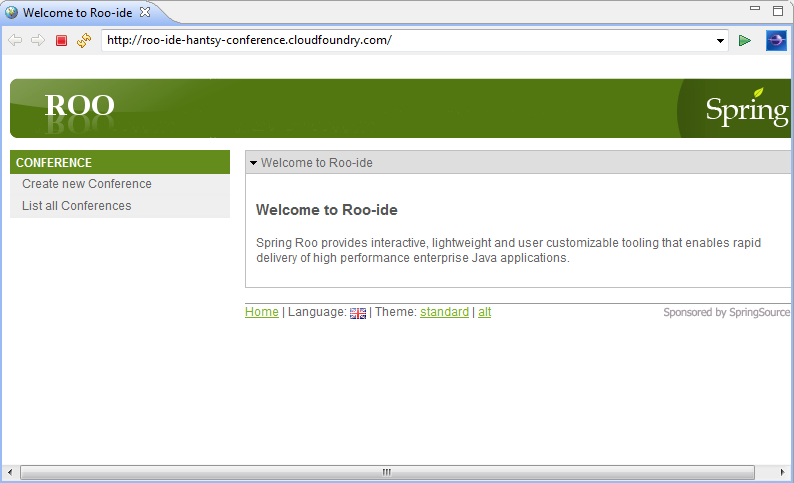
CloudFoundry also provides official client command tools for deploy your application into Cloudfoundry.com. Please go to the Cloudfoundry.com to get more info about this topic.
NOTE: CloudFoundry.com provides a VMWare image for developers in development stage, but your CPU must support Intel-VT(Unlucky, due to lack of Intel-VT support, it does not work on my laptop). you can deploy your project into the local VMWare server instead of the remote CloudFoundry.com service.
And VMware also provides a Eclipse IDE plugin, with which you can deploy the application into CloudFoundry in IDE, just like deploy into your local server instance.
Configuration for CloudFoundry
The following steps are based on the project we have created in before post.-
Add cloudfoundry dependency in your pom.xml.
<dependency>
<groupId>org.cloudfoundry</groupId>
<artifactId>cloudfoundry-runtime</artifactId>
<version>0.8.2</version>
</dependency>
-
Configure a cloud data source in spring configuration file applicationContext.xml.
<beans profile="cloud">
<cloud:data-source id="dataSource"/>
</beans>
Register a CloudFoundry.com account
Go to Cloudfoundry , click the Create Account button and follow the steps to register an account.
Deploy into CloudFoundry via Roo
There is a roo addon in the Roo repository which provides cloudfoundry support.Execute
addon list in the Roo console, you will get the list of current Roo addons.If you encounter a warning for the license, follow the warning info and type
download accept terms of use to accept the terms of use firstly.Run the following command to search "cloud" keyword in the search results list.
addon search cloudYou can install the addons by id or bundleSymbolicName. Run the following command and install cloudfoundry addon by the specified bundleSymbolicName option.
addon install bundle --bundleSymbolicName org.springframework.roo.addon.cloud.foundryNow you can use cloudfoundry addon freely as the before existing addons in your local system in Roo console.
Firstly login in cloudfoundry.com,
cloud foundry login --email <email> --password <password>Create a Cloud ready mysql database service.
cloud foundry create service --serviceType mysql --serviceName <yourMysqlServiceName>Deploy your app into cloudfoundry.com,
cloud foundry deploy --appName <yourAppName> --path CREATEIf you do not have a domain for your project, you can specify CREATE value to the path to create a new yourAppName.cloudfoundry.com for your application. Else specify the war path to --path option.
Bind the created MySQL service to your application.
cloud foundry bind service --appName <yourAppName> --serviceName <yourMysqlServiceName>Start your application,
cloud foundry start app --appName <yourAppName>You can view the current app list,
cloud foundry list appsIf you see STARTED status of your deployed app, it indicates your application is deployed and running successfully.
Open your browser, go to http://<yourAppName>.cloudfoundry.com.

Deploy into CloudFoundry from Eclipse
Firstly make sure you have installed CloudFoundry Eclipse plugin.If not, you can switch to the Extension tab in the SpringSource Dashboard interface. And find CloudFoundry in the list, click the checkbox before the CloudFoundry item and hint Install button to install it into your IDE.
-
Create a CloudFoundry server instance.
In the Server view, right click the whitespace and hint the New item in the context menu, and open the New server wizard.
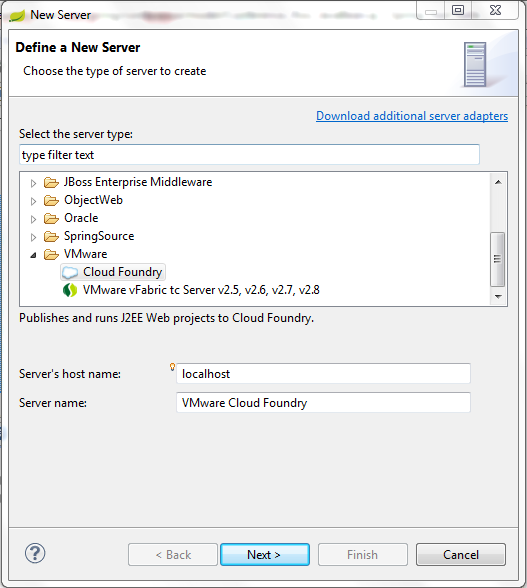
Expand VMware node and select CloudFoundry and press Next button.
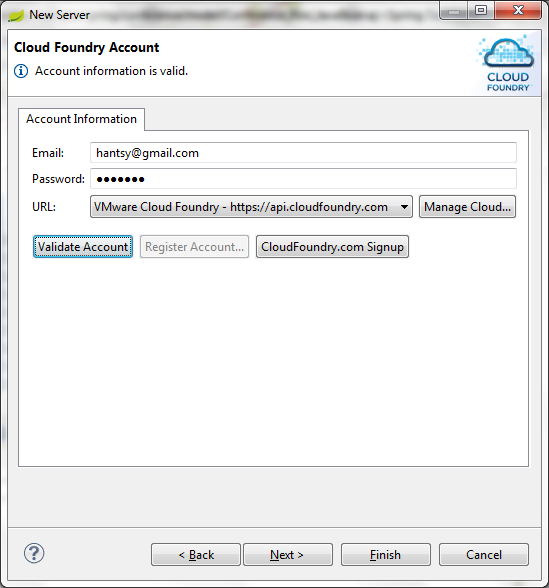
Enter your account info of CloudFoundry.com, click Validate Account to check if the email and password is valid.
Click Finish button, you will see a CloudFoundry instance in the Server view.
- Right click the CloudFoundry node in the Server view, select Add and remvoe... in the context menu.
-
In the popup dialog, select the created project and press Add button.
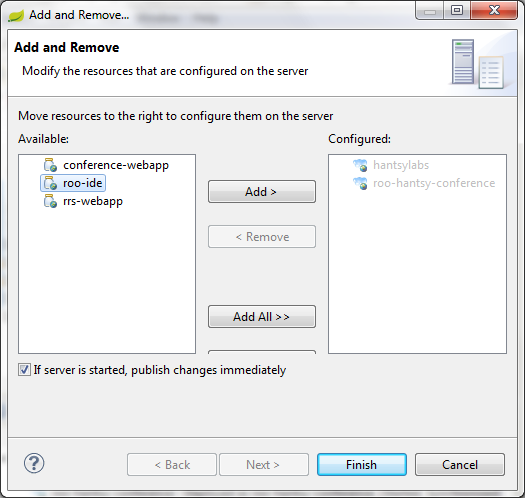
-
Fill the application details.
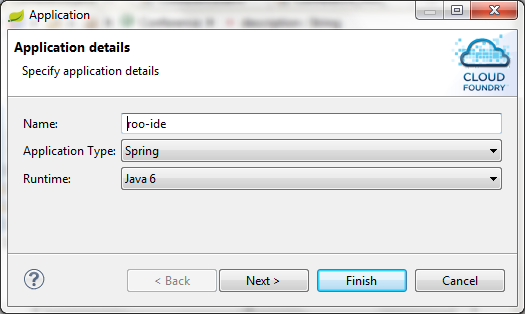
-
Fill the launch deployment info.
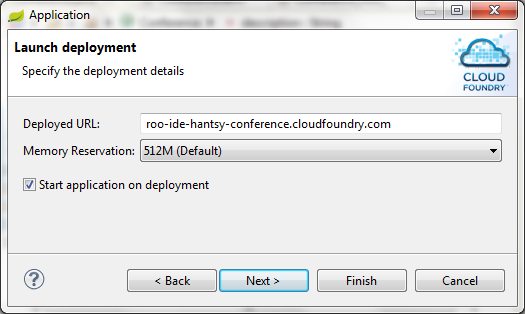
-
In the next step, you can select the service you want to be bound to
this application. You can also create a new service by click the New icon here.
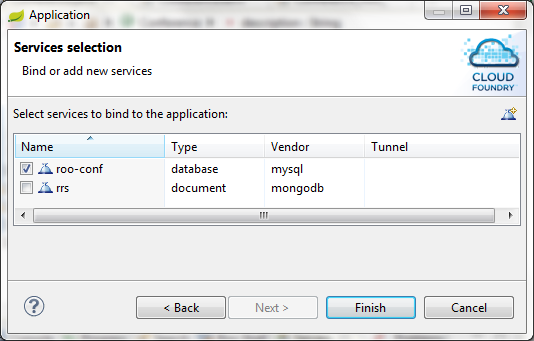
- Click Finish button to complete the steps.

If it is stopped, try to start it by clicking the Start in the context menu. You can also perform a Full publish to deploy a fresh application into CloudFoundry.
Navigate to the application home page.

CloudFoundry also provides official client command tools for deploy your application into Cloudfoundry.com. Please go to the Cloudfoundry.com to get more info about this topic.
NOTE: CloudFoundry.com provides a VMWare image for developers in development stage, but your CPU must support Intel-VT(Unlucky, due to lack of Intel-VT support, it does not work on my laptop). you can deploy your project into the local VMWare server instead of the remote CloudFoundry.com service.
评论