Create a restful application with AngularJS and CakePHP(IV): Simple authentication and authorization
Simple authentication and authorization
Now we add the basic security feature to this application, such as login, logout, only the author of the certain Post can edit and delete it.
Prepare the tables
Create a
users table, reuse the one from Blog tutorial.CREATE TABLE users ( id INT UNSIGNED AUTO_INCREMENT PRIMARY KEY, username VARCHAR(50), password VARCHAR(50), role VARCHAR(20), created DATETIME DEFAULT NULL, modified DATETIME DEFAULT NULL );
Alter
posts table, add a user_id column.ALTER TABLE posts ADD COLUMN user_id INT(11);
Thus allow multi users to add posts.
Authentication
Create
User model class.class User extends AppModel {
public $validate = array(
'username' => array(
'required' => array(
'rule' => array('notEmpty'),
'message' => 'A username is required'
)
),
'password' => array(
'required' => array(
'rule' => array('notEmpty'),
'message' => 'A password is required'
)
),
'role' => array(
'valid' => array(
'rule' => array('inList', array('admin', 'author')),
'message' => 'Please enter a valid role',
'allowEmpty' => false
)
)
);
}
Modify the
Post mdoel, add a belongsTo relation to User.public $belongsTo = array('User');
Create
UsersController class.class UsersController extends AppController {
/**
* Components
*
* @var array
*/
public $components = array('Paginator', 'RequestHandler');
public function beforeFilter() {
parent::beforeFilter();
$this->Auth->allow('add', 'login'); // We can remove this line after we're finished
}
public function login() {
if ($this->Session->read('Auth.User')) {
$this->set(array(
'message' => array(
'text' => __('You are logged in!'),
'type' => 'error'
),
'_serialize' => array('message')
));
}
if ($this->request->is('get')) {
if ($this->Auth->login()) {
// return $this->redirect($this->Auth->redirect());
$this->set(array(
'user' => $this->Session->read('Auth.User'),
'_serialize' => array('user')
));
} else {
$this->set(array(
'message' => array(
'text' => __('Invalid username or password, try again'),
'type' => 'error'
),
'_serialize' => array('message')
));
$this->response->statusCode(401);
}
}
}
public function logout() {
if ($this->Auth->logout()) {
$this->set(array(
'message' => array(
'text' => __('Logout successfully'),
'type' => 'info'
),
'_serialize' => array('message')
));
}
}
/**
* index method
*
* @return void
*/
public function index() {
$this->User->recursive = 0;
$this->set('users', $this->Paginator->paginate());
}
/**
* view method
*
* @throws NotFoundException
* @param string $id
* @return void
*/
public function view($id = null) {
if (!$this->User->exists($id)) {
throw new NotFoundException(__('Invalid user'));
}
$options = array('conditions' => array('User.' . $this->User->primaryKey => $id));
$this->set('user', $this->User->find('first', $options));
}
/**
* add method
*
* @return void
*/
public function add() {
if ($this->request->is('post')) {
$this->User->create();
if ($this->User->save($this->request->data)) {
$this->set(array(
'message' => array(
'text' => __('Registered successfully'),
'type' => 'info'
),
'_serialize' => array('message')
));
} else {
$this->set(array(
'message' => array(
'text' => __('The user could not be saved. Please, try again.'),
'type' => 'error'
),
'_serialize' => array('message')
));
$this->response->statusCode(400);
}
}
}
}
The add method is use for user registration.
All methods are designated for REST resources. Modify the routes.php, add the following line.
Router::mapResources("users");
Next enable
AuthComponent in AppController.class AppController extends Controller {
public $components = array('Auth', 'Session');
public function beforeFilter() {
$this->Auth->authorize = array('Controller');
$this->Auth->authenticate = array(
'Basic'
);
}
}
CakePHP provides several built-in authentication approaches,Form, Basic, Digest. Form is the default authentication approach, but it is designated for authentication from web pages. Basic is the simplest way to authenticate user in a REST environment, which read a HTTP header includes a base64 hashed username and password pair. In the real world, you can use SSL together to improve the security.
There are some third party AuthComponents can be found on Github.com, such as support for the popular Oauth, OpenId protocols etc.
Now build the frontend login.html and
LoginCtrl.<div ng-controller="LoginCtrl">
<form>
<fieldset>
<div class="control-group">
<label class="control-label" for="username">Username</label>
<div class="controls">
<input type="text" id="username" ng-model="username" required="required" class="input-block-level"/>
</div>
</div>
<div class="control-group">
<label class="control-label" for="password">Password</label>
<div class="controls">
<input type="password" id="password" ng-model="password" required="required" class="input-block-level"/>
</div>
</div>
</fieldset>
<div class="form-actions">
<a ng-click="login()" class="btn btn-primary btn-block">Login</a>
<a class="link" href="#/register">Not Registered</a>
</div>
</form>
</div>
The following is the
LoginCtrl.as.controller('LoginCtrl', function($scope, $rootScope, $http, $location) {
$scope.login = function() {
$scope.$emit('event:loginRequest', $scope.username, $scope.password);
//$location.path('/login');
};
});
The login mehtod raise an event:loginRequest event. In the app.js, use a response interceptor to process the event.
$rootScope.$on('event:loginRequest', function(event, username, password) {

    httpHeaders.common['Authorization'] = 'Basic ' + base64.encode(username + ':' + password);
    $http.get($rootScope.appUrl + '/users/login.json')
     .success(function(data) {
  console.log('login data @' + data);
  $rootScope.user = data.user;
  $rootScope.$broadcast('event:loginConfirmed');
     });

});
These code snippets are copied from another sample project hosted on github, it is a mature solution to process Basic authentication.
The register.html template.
<div ng-controller="RegisterCtrl">
    <h1 class="page-header">Register <small>all fields are required.</small></h1>
    <form  ng-submit="register()">
        <fieldset>
            <div class="control-group">
                <label class="control-label" for="email">Email</label>
                <div class="controls">
                    <input id="emailAddress" type="email" class="input-block-level"
                           ng-model="user.email" required="true"></input>
                </div>
            </div>
            <div class="control-group">
                <label class="control-label" for="username">Username</label>
                <div class="controls">
                    <input id="username" type="text" class="input-block-level"
                           ng-model="user.username" required="true"></input>
                </div>
            </div>
            <div class="control-group">
                <label class="control-label" for="password">Password</label>
                <div class="controls">
                    <input id="password" type="password" class="input-block-level"
                           ng-model="user.password" required="true"></input>
                </div>
            </div>
        </fieldset>
        <div class=form-actions>
            <input type="submit" class="btn btn-primary btn-block" value="Register"/>
        </div>
    </form>
</div>
The following is the content of
RegisterCtrl.as.controller('RegisterCtrl', function($scope, $rootScope, $http, $location) {
$scope.user = {};
$scope.register = function() {
console.log('call register');
var _data = {};
_data.User = $scope.user;
$http
.post($rootScope.appUrl + '/users/add.json', _data)
.success(function(data, status, headers, config) {
$location.path('/login');
})
.error(function(data, status, headers, config) {
});
}
});
When register a new account, the password field must be hashed before save into
users table. CakePHP provides a model lifecycle hook beforeSave for this purpose.public function beforeSave($options = array()) {
if (isset($this->data[$this->alias]['password'])) {
$this->data[$this->alias]['password'] = AuthComponent::password($this->data[$this->alias]['password']);
}
}
Authorization
CakePHP provides simple controller based authorization and complex AclComponent to provide fine grained authorization controls. In this application, use Controller based authorization
In the
AppController, set authorize property value as Controller.public function beforeFilter() {
$this->Auth->authorize = array('Controller');
//
}
Add a isAuthorized method in the
AppController, this method defines global authorization rule for all controllers.public function isAuthorized($user) {
if (isset($user['role']) && ($user['role'] == 'admin')) {
return true;
}
return false;
}
In the
PostsController, add a method isAuthorized($user) which only affect actions defined in PostsController.public function isAuthorized($user) {
// All registered users can add posts
if ($this->action === 'add') {
return true;
}
// The owner of a post can edit and delete it
if (in_array($this->action, array('edit', 'delete'))) {
$postId = $this->request->params['pass'][0];
if ($this->Post->isOwnedBy($postId, $user['id'])) {
return true;
}
}
return parent::isAuthorized($user);
}
In the
PostsController, add the following line to add method.public function add() {
$this->request->data['Post']['user_id'] = $this->Auth->user('id'); //
//
}
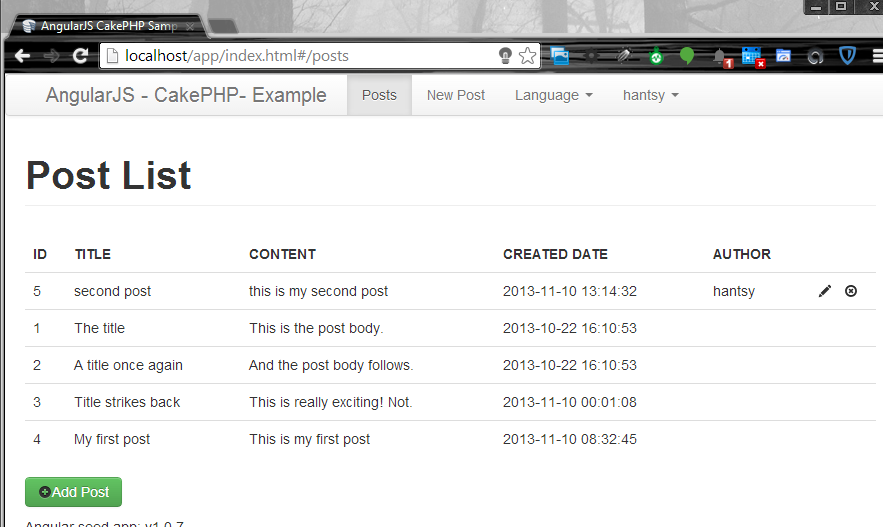
In the posts.html pages, try to display the author of the posts.
Add a new column in the table.
<table class="table">
<thead>
    <tr>
 ...
 <th>AUTHOR</th>
 ...
    </tr>
</thead>
<tbody>
    <tr ng-repeat="e in posts">
 ...
 <td>{{e.User.username}}</td>
 <td><a ng-click="editPost($index)" ng-show="user.id &&user.id==e.Post.user_id"><i
      class="icon-pencil"></i>
     </a>

     <a ng-click="delPost($index)" ng-show="user.id &&user.id==e.Post.user_id"><i
      class="icon-remove-circle"></i></a></td>
    </tr>
</tbody>
</table>
I also changed the visibility of the edit and delete icon, only show when the logged in user is the author of the Post.
Summary
In these four posts, we have tried to implement a simple Blog application which has same features with the one from official CakePHP Blog tutorial, the difference is that AngularJS was selected to build the frontend pages instead of the CakePHP web pages, and CakePHP was used for producing backend REST API.
评论