Create a restful application with AngularJS and Grails
In this example application, I will create a simple application which basic CRUD operations, and I reused some AngularJS codes of theAngularJS CakePHP Sample.
I assume you have installed the latest JDK 7 and groovy SDK 2.1.9. And also installed Spring Groovy/Grails Toolsuite or an Eclipse based IDE plus Groovy/Grails plugin.
Create a Grails project
Download a copy of Grails distribution from Grails.org. And extract the files into your local disc.
Add <grails>/bin to the system PATH enviroment variable.
Create a project using the following command.
grails create-app <app name>
Enter the app folder root, try to run the project in the embeded tomcat server.
cd <app>
grails run-app
After it is deployed and running, you should see the following like info.
|Running Grails application
|Server running. Browse to http://localhost:8080/angularjs-grails-sample
If you are using Grails 2.3.2, you maybe encounter a critical bug which will cause the above command failed under Windows system.
java.lang.instrument ASSERTION FAILED ***: "!errorOutstanding" with message transform method call failed at ../../../src/share/instrument/JPLISAgent.c line: 844
This bug had been marked as Blocker priority, and should be fixed in the upcoming 2.3.3 soon.
More info please refer to GRAILS-10756.
In the comments of this issue, there is a solution provided to overcome this barrier temporarily.
Add the following dependency in the BuildConfig.groovy.
dependencies {
// specify dependencies here under either 'build', 'compile', 'runtime', 'test' or 'provided' scopes e.g.
// runtime 'mysql:mysql-connector-java:5.1.24'


 build "org.fusesource.jansi:jansi:1.11"
}
Run
grails run-app again, you should see the successful info in browser.
Explore the generated codes
By default, the generated project use H2 as database, and Hibernate 3 for the persistence layer. The Hibernate 4 support is included Grails 2.3 and also is ready in the generated codes.
In the BuildConfig.groovy file.
runtime ":hibernate:3.6.10.3" // or ":hibernate4:4.1.11.2"
And in the DataSource.groovy file.
cache.region.factory_class = 'net.sf.ehcache.hibernate.EhCacheRegionFactory' // Hibernate 3
//    cache.region.factory_class = 'org.hibernate.cache.ehcache.EhCacheRegionFactory' // Hibernate 4
As you see, if you want to switch to Hibernate 4, what you need to do is only comment the Hibernate 3 facilities, and enable the Hibernate 4 alternatives.
Import the generated project as a Grails project into your IDE for the next steps.
Code the backend REST API
Create a entity Book.
grails create-domain-class Book
You can also create it from Eclipse Wizard step by step.
This command will generate Book.groovy and BookSpec.groovy test at the same time.
@Resource(uri='/books')
class Book {

 String title
 String author
 Double price

 static constraints = {
  title blank:false
  author blank:false
 }
}
@Resource is a Grails specific annotation. An entity annotated with@Resource will be exposed as REST resource, the basic CRUD operations are ready for use.
| URL | HTTP Method | Description |
| /books.json | GET | Get the list of Books |
| /books.json | POST | Create a new Book |
| /books/:id.json | GET | Get the details of a Book |
| /books/:id.json | PUT | Update a Book by id |
| /books/:id.json | DELETE | Delete a Book by id |
Open the BootStrap.groovy file, add some initial data.
def init = { servletContext ->
 new Book(title:"Java Persistence with Hibernate", author:"Gavin King", price:99.00).save()
 new Book(title:"Spring Live", author:"Matt Raible", price:29.00).save()
}
Run the application, open your browser, navigate tohttp://localhost:8080/angularjs-grails-sample/books.json.

Grails 2.3 also includes Controller based REST resource producing and other advanced REST features, which are explained in the official document.
Build the frontend AngularJS pages
Book List
The template code.
<div ng-controller="BookListCtrl">
    <h1 class="page-header">Book List</h1>
    <table class="table">
        <thead>
            <tr>
                <th width="25px">ID</th>
                <th>TITLE</th>
                <th>PRICE</th>
                <th>AUTHOR</th>
                <th width="50px"></th>
            </tr>
        </thead>
        <tbody>
            <tr ng-repeat="e in books">
                <td>{{e.id}}</td>
                <td>{{e.title}}</td>
                <td>{{e.price|currency}}</td>
                <td>{{e.author}}</td>
                <!-- ng-show="user.id &&user.id==e.user_id" -->
                <td><a ng-click="editBook($index)" ><i
                            class="icon-pencil"></i>
                    </a>

                    <a ng-click="delBook($index)" ><i
                            class="icon-remove-circle"></i></a></td>
            </tr>
        </tbody>
    </table>
<!-- ng-show="user.username" -->
    <p>
        <button type="button" class="btn btn-success"
                ng-click="addBook()">
            <b class="icon-plus-sign"></b>Add Book
        </button>
    </p>
</div>
The
BookListCtrl code.as.controller('BookListCtrl', function($scope, $rootScope, $http, $location) {
var load = function() {
console.log('call load()...');
$http.get($rootScope.appUrl + '/books.json')
.success(function(data, status, headers, config) {
$scope.books = data;
angular.copy($scope.books, $scope.copy);
});
}
load();
$scope.addBook = function() {
console.log('call addBook');
$location.path("/new");
}
$scope.editBook = function(index) {
console.log('call editBook');
$location.path('/edit/' + $scope.books[index].id);
}
$scope.delBook = function(index) {
console.log('call delBook');
var todel = $scope.books[index];
$http
.delete($rootScope.appUrl + '/books/' + todel.id + '.json')
.success(function(data, status, headers, config) {
load();
}).error(function(data, status, headers, config) {
});
}
});
Add a new Book
The template code.
<div ng-controller="NewBookCtrl">
 <form class="form-horizontal">
  <h1 class="page-header">New Book</h1>
  <fieldset>
   <div class="control-group">
    <label class="control-label" for="title">Title</label>
    <div class="controls">
     <input id="title" type="text" class="input-block-level"
      required="true" ng-model="book.title"></input>
    </div>
   </div>
   <div class="control-group">
    <label class="control-label" for="title">Author</label>
    <div class="controls">
     <input id="title" type="text" class="input-block-level"
      required="true" ng-model="book.author"></input>
    </div>
   </div>
   <div class="control-group">
    <label class="control-label" for="title">Price</label>
    <div class="controls">
     <input id="title" type="number" class="input-block-level"
      required="true" ng-model="book.price"></input>
    </div>
   </div>
  </fieldset>
  <div class="form-actions">
   <button class="btn btn-primary" ng-click="saveBook()">Add
    Book</button>
  </div>
 </form>
</div>
The
NewBookCtrl code.as.controller('NewBookCtrl', function($scope, $rootScope, $http, $location) {
$scope.book = {};
$scope.saveBook = function() {
console.log('call saveBook');
$http
.post($rootScope.appUrl + '/books.json', $scope.book)
.success(function(data, status, headers, config) {
$location.path('/books');
}).error(function(data, status, headers, config) {
});
}
});
Edit a Book
The template code.
<div ng-controller="EditBookCtrl">
 <form class="form-horizontal">
  <h1 class="page-header">Edit Book({{book.id}})</h1>
  <fieldset>
   <div class="control-group">
    <label class="control-label" for="title">Title</label>
    <div class="controls">
     <input id="title" type="text" class="input-block-level"
      required="true" ng-model="book.title"></input>
    </div>
   </div>
   <div class="control-group">
    <label class="control-label" for="title">Author</label>
    <div class="controls">
     <input id="title" type="text" class="input-block-level"
      required="true" ng-model="book.author"></input>
    </div>
   </div>
   <div class="control-group">
    <label class="control-label" for="title">Price</label>
    <div class="controls">
     <input id="title" type="number" class="input-block-level"
      required="true" ng-model="book.price"></input>
    </div>
   </div>
  </fieldset>
  <div class="form-actions">
   <button ng-click="updateBook()" class="btn btn-primary">Update
    Book</button>
  </div>
 </form>
</div>
The
EditBookCtrl code.as.controller('EditBookCtrl', function($scope, $rootScope, $http, $routeParams, $location) {
var load = function() {
console.log('call load()...');
$http.get($rootScope.appUrl + '/books/' + $routeParams['id'] + '.json')
.success(function(data, status, headers, config) {
$scope.book = data;
angular.copy($scope.book, $scope.copy);
});
}
load();
$scope.book = {};
$scope.updateBook = function() {
console.log('call updateBook');
$http
.put($rootScope.appUrl + '/books/' + $scope.book.id + '.json', $scope.book)
.success(function(data, status, headers, config) {
$location.path('/books');
}).error(function(data, status, headers, config) {
});
}
});
Browse the frontend UI
Open browser, navigate to http://localhost:8080/angularjs-grails-sample/app/index.html#/books.
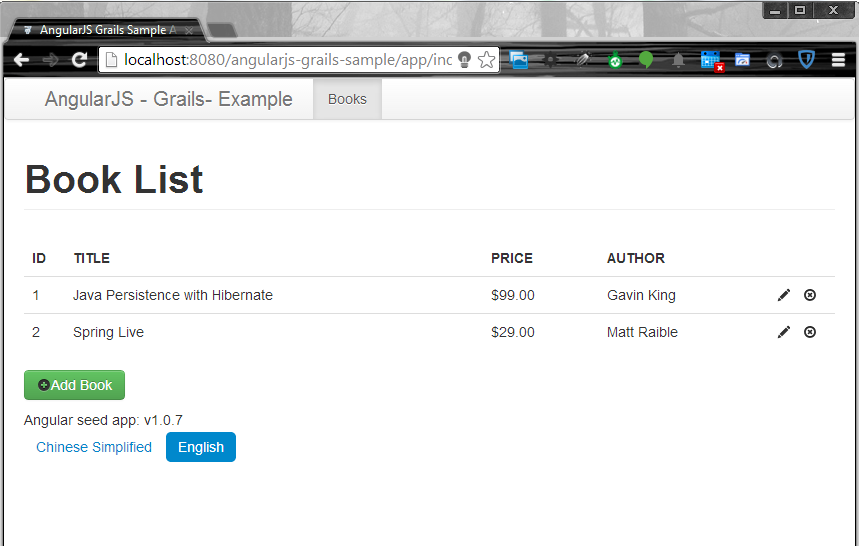
Try add a new Book and edit and delete it.
Summary
In this example application, Grails was used to produce the backend REST API, it is also simple and stupid work. Currently, I have not added security feature, maybe add it in future.
The code is hosted on https://github.com/hantsy/angularjs-grails-sample/.
评论